
FPGA-384 - Example Verilog Programs.
The software download comes with a set of examples.
The build is done on a Raspberry Pi but the programming can be done either direct from the Pi or through an Arduino. The fpga-384 utility or Arduino program contain both the board programmer and the test signals to run the examples. Using Blink as our first example... (all the rest are the same)
Compile on Raspberry Pi, program and test from Raspberry Pi
Compile on Raspberry Pi, program and test from Arduino
Then open the resulting project in the Arduino IDE or if you took the option to install Arduino-mk you can run "make upload".
Blink.
The simplest example with flashing LEDs.
PWM.
Fading the LED brightness using PWM.
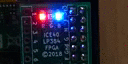
Gates.
The host will clock the FPGA running through a set of logic gates (AND, OR, XOR, NOT) and the LEDs will show the result of them.
The gate type is chosen dependent upon a bit pattern selection, and the output is the logical gate application of the input.
Input logic A & B are red and green, result C is blue.
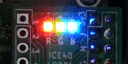
Adder.
The host will clock the FPGA running through a simple one bit full adder taking in a single bit and a carry bit and will produce the result bit and a new carry bit.
Resulting bit and carry bit are shown on the leds.
Parity.
The host will clock the FPGA running through a sequence where four bits are used as an input to find the even parity.
The resulting parity bit is shown on an led.
Rand.
The FPGA will provide a running Pseudo Random Number Generator of the Linear Feedback Shift Register type.
A single bit is shown on an led which should flash with an unpredictable pattern.
Pattern.
Shows the application of an internal state machine. A binary pattern is fed into an input which changes the internal state. The green LED lights when the full pattern is correctly received.
BCD.
This shows Binary Coded Decimal logic.
Decoder.
Shows how to generate specific binary output, given a binary input. Can be used to create a 3-8 decoder, for example.
I2C.
Shows how to create a device with a specified I2C address.
SevenSegment.
A more advanced example for multiplexing 4 digits of seven segment LED displays. The wiring for the displays will depend on the type of seven segment display device being used. The verilog will show the skeleton code for driving them based on the segment labels a-g with the four common pins.
Serial.
Implements a low speed serial encoder / decoder. The serial port should work well at 9600 baud.
Note: You may need to configure a raspberry pi to switch its relevant IO pins to be the serial lines.
You will find the menu under the 'interfacing options' / 'serial'.
Also, you need to run the test application with sudo as well.